How to Layer a Raised Garden Bed
As an Amazon Associate we earn from qualifying purchases.
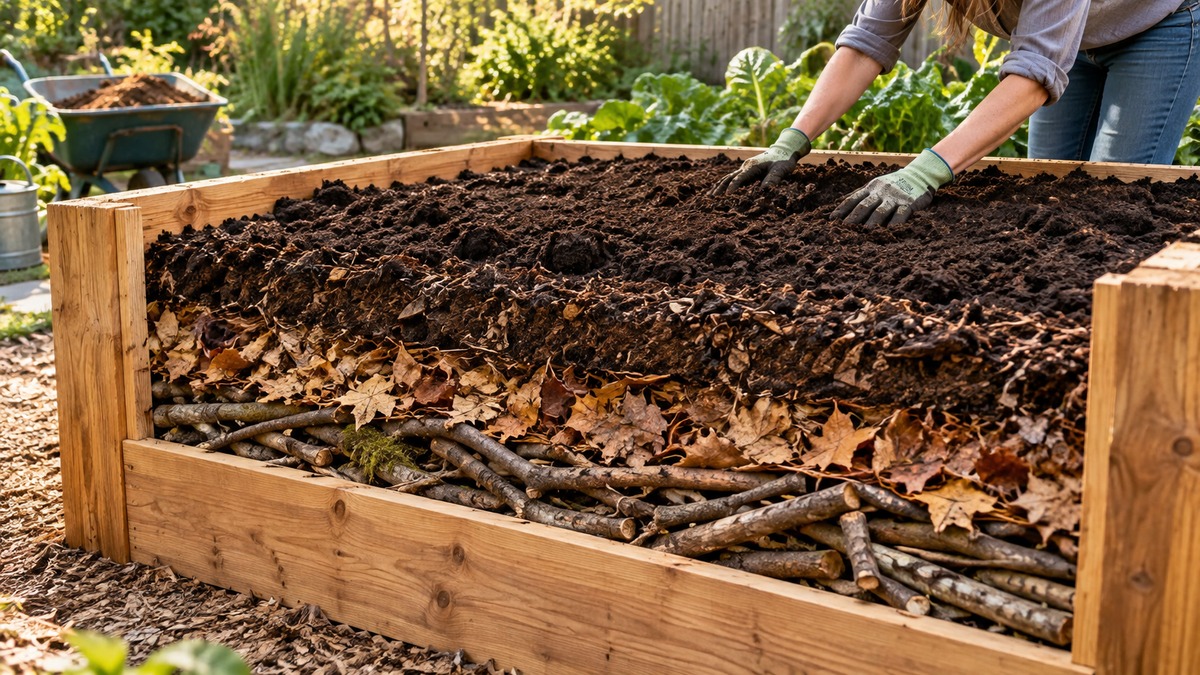
Learning how to layer a raised bed means building the bed from alternating organic materials, usually over ground you have cleared, so that the layers break down into planting soil. Oregon State University calls this sheet mulching, and NC State Extension calls it sheet composting and lasagna gardening. The layers need time, so the sources point to fall as the best start. This guide follows their steps from the base layer to planting through the mulch, and it says plainly where the sources give no number.
Quick answer
- Start in the fall so the layers have the winter to break down. Oregon State says “Start in fall so layers have winter to break down.”
- Clear the ground, loosen the soil, and lay cardboard or newspaper on it, moistened until damp.
- Build alternating layers of carbon-rich and nitrogen-rich material, about 2 inches each, until the bed is about 18 inches deep.
- Finish with a 2 to 6 inch brown layer. You can plant right away into the top layer, or wait for the layers to break down.
What layering a raised bed means
Sheet mulching and lasagna gardening
Oregon State’s sheet mulching guide defines the base layer by its job. The guide says: “Sheet mulching uses a layer of cardboard, newspaper, or heavy paper placed on the soil as a barrier to smother existing weeds and seeds in the soil, denying them access to sunlight required for photosynthesis and growth.” The bed then becomes the compost. NC State Extension describes the same method in its sheet mulching article: “Sheet mulching, also called sheet composting and lasagna gardening, involves layering of organic materials, in a similar ratio as for a compost pile, to prepare a new planting area.”
NC State’s article adds that the method “saves labor while enriching the soil”, which is one reason it suits a bed you would otherwise dig. The layers do two jobs at once. The bottom layer is the barrier against what is already growing, and the stacked materials break down into planting soil. The sources describe the result as a new planting area, not as a finished bed.
Framed or unframed
The layers can sit inside a frame or be built without one. Oregon State’s no-till guide offers both options: “Build a simple raised frame or mound layers into an unframed bed.” Both options appear in the guide, and it leaves the choice to you.
Materials for the layers
Cardboard or newspaper for the base
Oregon State’s sheet mulching guide says, “Using cardboard tends to be the most popular method.” It asks for a specific kind of cardboard, saying you should use the “plain-brown corrugated variety, not shiny, glossy, or printed,” because glossy or printed board is harder to compost. The same guide advises removing any tape or staples before the board goes down. Newspaper also works as the barrier, and the Illinois raised bed checklist refers to “layers of newspaper” as one option for covering the ground. The same checklist notes that “Newspaper or cardboard can be left at the bottom of the bed as it will degrade,” so the base does not have to be pulled out later.
NC State’s method starts by moistening the base: “Add a layer of cardboard or newspapers on top of the loosened soil and moisten with water until damp.”
Carbon-rich and nitrogen-rich layers
NC State Extension’s method alternates the two kinds of material. It says: “Next, add a 2-inch layer of a carbon-rich material on top of the cardboard or newspaper layer. For example, straw or dry leaves work well.” The next layer is nitrogen-rich. Oregon State describes the two groups as “browns” for carbon-heavy materials and “greens” for nitrogen-heavy ones. For lasagna composting, its guide says the materials you add “should alternate between one layer of nitrogen-rich material” with the carbon-rich layers, which is the pattern the bed follows. The sources do not give a ratio beyond the 2-inch layers, so the stack is a set of alternating layers rather than a recipe.
Build the bed step by step
Prepare the ground
Start with the ground under the bed. Oregon State’s first step for a grassy site is to “Mow grass as low as possible, or start on an old planting bed.” NC State’s guide says that, to establish a new planting area, you should “remove any groundcover first” and then use a tool to break up the soil. The guide says: “Use a garden spade or a broad fork to pierce the soil and lightly loosen it.” Oregon State’s guide adds that you can begin on an old planting bed, and that the soil needs loosening with a fork before the layers go on: “Loosen the soil with a digging fork to improve aeration.” It also notes: “Even punching holes works.”
Oregon State’s steps then say to “Remove weeds” before the base goes down, which lines up with the Illinois checklist advice to clear existing grass and weeds before a new bed is filled. Once the ground is ready, the guide says to “Lay overlapping cardboard as a base and water it.”
Stack the layers
Oregon State’s no-till guide describes the build as alternating layers. It says the bed should be built “until the bed is about 18 inches deep.” NC State uses 2-inch layers for the carbon and nitrogen materials, which is the scale to use when you count the stack as you build it. If you are planning how much material the finished bed will need, how much soil a raised bed needs gives the volume side of that calculation.
Finish the top
The top of the bed matters most if you want to plant soon. Oregon State says: “Top with a 2- to 6-inch brown layer; use the thicker end if planting right away.” If you do not want to plant right away, the same guide describes a different finish, and bagged soil types for filling a raised bed covers the choice of soil for that top layer: “sifting a 2- to 3-inch layer of compost or garden soil” over the bed and planting into that instead.
Timing: start in the fall
Give the layers the winter
Oregon State repeats the timing point in two places. Its no-till guide says to start in the fall, and its sheet mulching guide says the cardboard “breaks down after several months” in the ground. That is why the fall start is the sources’ default, rather than a spring start in the same season.
Judge readiness by the materials
The sheet mulching guide describes readiness by appearance, not by a calendar. It says that a bed is “finished” when the layers have decomposed to the point that the original materials are “no longer recognizable”. The test is what the materials look like, not how many weeks have passed.
Planting through the mulch
Oregon State’s no-till guide gives a planting method for the bed. It says: “Transplants are often easier in no-till systems. Use a trowel to open holes through the mulch and plant directly.” For seeds, the same guide describes a different step: “For direct seeding, pull mulch back and smooth the surface with a rake.” That is the same bed, planted two ways, and the method depends on whether you are setting out transplants or sowing seed. The sheet mulching guide adds that “Holes can be cut into the cardboard to install new plants,” so a bed built on cardboard can take transplants without the base being removed. The same guide notes that the mulch “will also begin to decompose through contact with the soil.”
Keep the bed workable
Oregon State’s no-till guide also gives a rule about the width of the bed, which affects how often you step on it. Once the bed is planted, a companion planting layout for raised beds shows one way to arrange crops in the space.
It says: “Keep beds only as wide as you can reach from the sides, and make paths (mulched with straw) to prevent compaction.” The guide ties the width to how far you can reach and the paths to compaction, and it does not give a number of walking passes or a time limit.
Mistakes to avoid
- Using glossy or printed cardboard. Oregon State says plain-brown corrugated board is the choice, because glossy or printed board is harder to compost.
- Leaving tape and staples in the base. The same guide says to remove them before laying the board.
- Putting plastic under the layers. The Illinois checklist says plastic should be removed before soil goes in, so that it does not impede drainage.
- Making the bed wider than you can reach. The no-till guide ties width to compaction and to how you reach the middle.
- Planting before the bed is ready without a top layer. Oregon State’s top-layer step is the way to plant right away, and skipping it leaves the materials exposed.
How we chose
We chose the pages that describe layering as a method rather than a product, and we limited the list to university extension sources. Oregon State University has two pages in this list, a sheet mulching fact sheet and a no-till article, because each gives different steps that the other does not. NC State Extension and the University of Illinois Extension are included because they describe the same base layer and the same clearing step from a different region, which helps check the advice. We opened each page with curl on 2026-10-21 and matched every quoted sentence against the fetched text. We did not use blog posts or retail pages for any step.
What we could not verify
We could not verify a decomposition time that applies to every climate, a total soil volume for a layered bed, or a single set of layer depths for all materials. The pages we opened give general guidance, and where they give a range, the range is quoted here.
What the sources do not say
The sources do not give a number of months for the layers to break down, because Oregon State says the cardboard breaks down “after several months” and that the time depends on the region and soil type. They do not give a list of materials to avoid beyond the glossy and printed cardboard point, and they do not give a height for a framed bed. Nothing here recommends a product, and the post does not rely on any product listing.
Frequently asked questions
Can you plant in a layered bed the same spring?
Yes, according to the top-layer step in Oregon State’s no-till guide. The guide says to top the bed with a 2 to 6 inch brown layer when you plant right away, or to sift a thin layer of compost or garden soil over the bed and plant into that. The fall start still gives the layers more time to break down, and the sources do not say how the early planting affects the bed later.
Does a layered bed need a frame?
No. Oregon State’s guide offers a simple raised frame or an unframed mound, and it leaves the choice to you. A frame keeps the edges in place, while an unframed bed takes more ground. Pick the option that suits the space you have.
Is glossy cardboard acceptable for the base?
The sources say to avoid it. Oregon State asks for plain-brown corrugated board, and it says shiny, glossy or printed board is harder to compost. Remove any tape or staples before you lay the board down.
How long until the layered bed is ready?
The sources do not give a fixed number of months. Oregon State says the bed is ready for full planting when the original materials are no longer recognizable, and it says the cardboard breaks down over several months, depending on soil type and region. Check the bed in the spring and judge it by what you can still see.
Should anyone walk on a layered bed?
The guide’s advice is to keep the bed narrow enough to reach from the sides and to mulch the paths with straw, which prevents compaction. Working from the paths is the way to keep foot traffic off the layers.
Sources
- https://extension.oregonstate.edu/catalog/em-9559-sheet-mulching-lasagna-composting-cardboard (opened 2026-10-21)
- https://extension.oregonstate.edu/news/layer-compost-lasagna-style-no-till-gardening (opened 2026-10-21)
- https://extensiongardener.ces.ncsu.edu/news/sheet-mulching-2020-winter-piedmont-news/ (opened 2026-10-21)
- https://extension.illinois.edu/sites/default/files/raised_bed_checklist.pdf (opened 2026-10-21)